How to create Jungle Text Part 2
Step 17
Now that we have our shape we can start making it look like a berry! Drag ‘Piece’ and drop it on Group icon ![]() at the bottom of layers panel to place it in a group (this’ll make things easy later on). Now move the Group up above ‘Berry Shape’ in layers panel then hit Ctrl+ T. At the top you should see this set of fields appear. Change the ‘W’ and ‘H’ boxes from 100% to 50%. Hit enter to apply changes.
at the bottom of layers panel to place it in a group (this’ll make things easy later on). Now move the Group up above ‘Berry Shape’ in layers panel then hit Ctrl+ T. At the top you should see this set of fields appear. Change the ‘W’ and ‘H’ boxes from 100% to 50%. Hit enter to apply changes.
![]()
Step 18
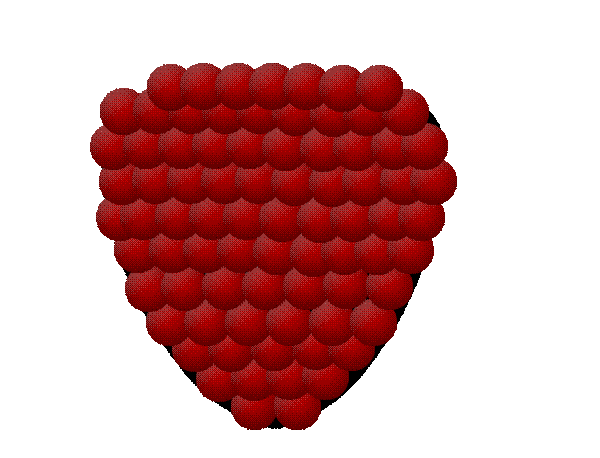
Move ‘Piece’ to the bottom of ‘Berry Shape’ for we’re now constructing our berry! We’ll continue on this way, using ‘Berry Shape’ as a guide, by duplicating ‘Piece’ and placing the duplicates next to each other to form a row, then begin stacking, like this:

Step 19
Continue doing duplicating till the entire berry shape is covered. Remember to place them in a brick-like pattern to eliminate as many cracks as possible.
Step 20
Once you’ve covered your berry shape you can merge the ‘Pieces’ group (Right-click > Merge group) to give you one piece (while you’re at it, you can hide ‘Berry Shape too – click the eye next to it).
Step 21
Using the Burn Tool (O), darken the edges of your berry then click once in the center, after you set the brush size to 180 with a hardness of 0%, the Range to Shadows, and the Exposure to 25%.

Step 22
Now take the Dodge Tool, (right-click the burn tool), and using a brush size of 168, a range of Highlights, and an exposure of 17%, brush lightly over the berry, focusing especially on the center.

Step 23
Now that we’re done with the base of our berry, it’s time we put it together and move on. Remember the leave window? Open it up, highlight all of the leaf layers and drag and drop them on the group icon to put them in a group. Rename this group to ‘Leaves’.
Hit T then click on ‘Leaves’. In the workspace, drag the leaves from their window onto the berry window to copy and paste them in one easy step. Resizeto fit, then open group and rotate and place leaves how you choose. Click on ‘Leaves’ group, drag and drop on ‘New Layer’ icon ![]() to duplicate group, head to Edit > Transform > FlipHorizontal>, then open ‘Leaves’ duplicate and position to fit:
to duplicate group, head to Edit > Transform > FlipHorizontal>, then open ‘Leaves’ duplicate and position to fit:

Step 24
Select all layers (Berry and Leaves groups 1 & 2), hit T, hold shift, and size it down a bit to make some room for the stem:

Step 25
Make a new layer then take the Pen (P). Click once directly above the leaves in the center (1), click again about an inch above that slightly to the left (2), then anchor one more point in the center (3). Right-click the pen tool and select Add Anchor Point Tool, then click and drag 3 slightly to the right to give your stem a curve.

Step 26
Set your color to #6c8f07. Select the brush and change the size to 7 and the hardness to 0%. Go back to the pen tool, right-click the path that we’ve made, and click stroke path. Make sure it’s set to Brush and the Simulate Pressure box is unchecked. Hit ok, then press enter.

Step 27
In the layer’s panel, move the stem layer to just above the berry and below the leaves. Double click and apply the following settings:
- Inner Shadow: Distance: 5 – Size: 6. Leave all the other settings at default.
Now that we’ve added our stem, we can put all layers in a group. Select all and drag and drop onto group icon, then rename your group, ‘Berry’. We can finally go back to our first window, our jungle scene, and start constructing the final picture.

Step 28
After going back to your blurred jungle scene and making a new layer (call it ‘Vine’), change your fore color to #77aa01 and your brush size to 7 with 0% hardness. Take the pen tool (P) and make the following points:

Step 29
Right-click the pen tool and select Add Anchor Point Tool and make the following points. After anchoring the points, click and drag slightly in various directions to give a somewhat bumpy, twisty look:

Once you’re done, right-click and select stroke path w/simulate pressure then hit enter to complete:

Step 30
Make a new layer and repeat the process, changing the curves for slight variations:

Step 31
Now you have two vines! Double-click on either one and apply the following settings:
- Bevel and Emboss: Depth: 100% - Direction: Down – Size: 5 – Soften: 0 – Angle: -137 – Altitude: 30 – Highlight Mode Opacity: 44% - Shadow Mode Opac ity: 67%.
Click Ok, then right-click layer > copy layer style. Right-click second vine layer > paste layer style, then position vines however you like:

Step 32
Go back to your Leaves window, and drag and drop the group onto your jungle scene as you’ve done with the berry. You’ll need to resize to fit on the vine:

Step 33
Continue adding leaves and bunches of leaves by duplicating the group (drag and drop onto new layer icon). You can open the group and hide some leaves to vary the bunch sizes. You can also resize to vary leaf sizes.

Step 34
Change your brush size to 3 and on a new layer (name ‘Twist’) with your fore color still at #77aa01, draw a large loopy figure as shown:


0 Response to "How to create Jungle Text Part 2"
Post a Comment