How to create Jungle Text Part 3
Step 35
Right-click the layer and click paste layer style (this will apply the same settings as the vine), then resize and place on vine as shown:

Duplicate and place in 3 more places: one on each end of each vine. Now select vines and twise layers and drag them all into a group. Call it ‘Vines 1’.

Step 36
Open up your berry window as it’s time to add the berries! Click once on the group name ‘Berry’, hit V on your keyboard, and then click and drag your berry onto your jungle scene. You’ll definitely need to size it down! Once it’s a considerably size, place it on the lowest vine, being sure to connect the stem with the vine:

Step 37
Merge the berry group by right-clicking and selecting merge group. Then, hold down Ctrl and click on layer thumbnail to select the contents. Make a new layer then move it directly beneath this layer. Hit D to change colors back to default then fill selection with black. Press Ctrl +D to deselect then head over to Filter > Blur > Gaussian Blur and enter a radius of 3.5 pixels. Finally, hold Ctrl and click on berry layer, then drag and drop onto new layer icon to duplicate. Hit V, then move your new twin berry to the right of the upper vine:

Step 38
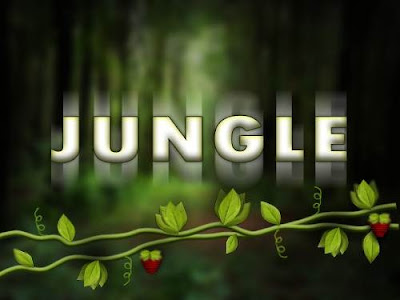
Now it’s time for us to add the letters. Hit D then X to change the fore color to white. Hit T to select the type tool then click in the center. Using Tw Cen MT Condensed Extra Bold, type JUNGLE:

Step 39
Duplicate the layer (Ctrl + J) twice. Change the color of the lowest layer (the original JUNGLE) to #0e1a03, then right-click and rasterize them all. Hide the two top layers leaving only the dark green layer apparent. Using the Gaussian blur, blur the word using a 1.7 radius.

Step 40
Put the eye back next to the JUNGLE copy (the layer directly above the green JUNGLE) and then go to Filter > Blur > Motion Blur and enter a value of 68 for the distance. Leave the angle at 90.

Step 41
Now show the upmost layer by putting the eye back next to it. Double click on the layer and apply the following settings:
- Drop Shadow: Opacity: 75 – Angle: -90 – Distance: 0 – Spread: 0 – Size: 6
- Inner Shadow: Opacity: 75 – Angle: -90 – Distance: 5 – Cho ke: 0 – S ize: 9
- Inner Glow: Blend Mode: Hard Light – Opacity: 75 – Color: a6c 43 9 – Technique: Softer – Source: Edge – Choke: 0 – Size: 9
- Stroke: Size: 1 – Position: Outside – Color: 202b0e

Step 42
Now duplicate ‘Vines 1’ group, right-click and merge it then hit V and move it up over the word jungle:

Step 43
Here is a part that we have to be extra careful when working on. Select the erase tool and set the size to 7px. We want to erase specific parts of the vine to create and entangled look, so, moving slowly and carefully, erase the following parts:

Step 44
Once you’re done, double click the layer and add a drop shadow of a size of 6 with a distance and spread of 0. Now we can add a berry to the bottom vine:

Step 45
You’re almost done, just hang in there! Go back to the original berry window, hit V and drag and drop the group onto the layer, this time you don’t have to resize. Just rotate a bit and place it to the far left:

Step 46
Repeat step number 45, only this time with the leaves. Go to the leaves window, drag and drop, and place in the far right:

Step 47
Now for the final touch we’ll be using a magical brush, free from brusheezy.com. If you don’t have it, no problem! You can use two brushes of 2px and 3px sizes and dot on the design, and add some haze by adding a layer underneath and blurring it. If you use the brush, it should look like this:

Step 48
Once you have it like this (make sure you’ve brushed on a new layer!), you want to use a size 17 brush with 0% hardness to remove the excess, like this:

Step 49
Now for the very last step: double click this layer (whether you used the magical brush or created your own dust) and click on ‘Outer Glow’. Leave settings at default and congratulations, you’re done!


0 Response to "How to create Jungle Text Part 3"
Post a Comment